Hilt로 의존성 주입 시작하기
Dagger 2와 Hilt
Hilt는 Dagger 설정 코드를 생성하는 코드로 작동한다.
Dagger의 상용구를 제거하고 실제로 개체를 주입할 위치를 정의하는 측면만 남긴다.
Hilt 장점
- 감소된 상용구
- 분리된 빌드 종속성
- 단순화 된 구성
- 향상된 테스트
- 표준화 된 구성 요소
컴포넌트
컴포넌트 계층
Hilt는 Dagger Component를 직접 정의하거나 인스턴스화 하지 않는다.
대신 Hilt는 사용자를 위해 미리 정의된 구성요소를 제공한다.
Hilt는 안드로이드 애플리케이션의 다양한 라이프 사이클에 자동으로 통합되는 Component를 내장하고 있다.

각 Component위의 어노테이션은 각 Component LifeCycle에 대한 바인딩 범위를 지정하는 데 사용되는 어노테이션이다.
각 Component 아래 화살표는 하위 Component를 가리킨다.
일반적으로 하위 Component의 바인딩은 상위 Component의 바인딩에 종속성을 가질 수 있다.
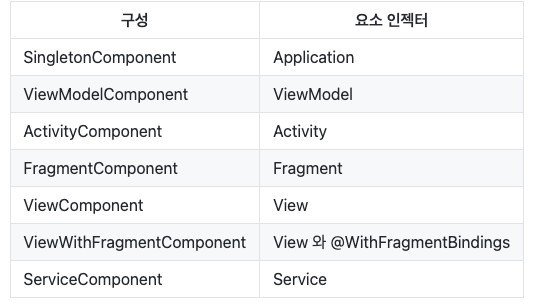
Inject에 사용되는 컴포넌트
@AndroidEntryPoint와 같은 Hilt API를 사용하여 Android 클래스를 주입할 때
표준 Hilt 구성요소는 인젝터로 사용된다.
인젝터로 사용되는 구성요소는 해당 Android 클래스에 표시되는 바인딩을 결정한다.
컴포넌트 수명
Component의 수명은 두 가지 중요한 방식으로 바인딩의 수명과 관련 있기 때문에 중요하다.
- Component가 Create될 때와 Destroy 될때 사이의 범위 바인딩의 수명을 제한한다
- 주입된 값이 사용될 수 있는 멤버(e.g
@Inject필드가 null이 아닌 경우)를 나타낸다
Component의 수명은 일반적으로 안드로이드 클래스의 해당 인스턴스의 생성(Create)과 파괴(Destroy)에 의해 제한된다.

범위지정 바인딩(Scoped) vs 비 범위 바인딩(UnScoped)
기본적으로 Dagger의 바인딩은 "범위 없음(UnScoped)"이다.
즉, 바인딩을 요청할 때마다 Dagger가 바인딩의 새 인스턴스를 만든다.
그러나 Dagger는 특정 컴포넌트에 대한 바인딩도 "범위지정(Scoped)" 할 수 있다.
범위 지정 바인딩은 지정된 컴포넌트의 인스턴스 당 한 번만 생성되며, 해당 바인딩에 대한 모든 요청은
동일한 인스턴스를 공유한다.
// 범위없음(UnScoped)바인딩
// 이 바인딩에 대한 각 요청은 새 인스턴스를 가져온다
class UnscopedBinding @Inject constructor() {
}

// 범위지정바인딩(Scoped)바인딩
// 이 바인딩에 대해 동일한 컴포넌트인스턴스의 각 요청은
// 동일한 인스턴스를 가져온다.
@FragmentScoped
class ScopedBinding @Inject constructor() {
}
모든 Fragment 인스턴스가 @FragmentScope로 바인딩 범위의 동일한 인스턴스를 공유하지는 않는다.
각 Fragment 인스턴스는 Fragment Component의 새 인스턴스를 가져오므로 모든 범위 바인딩의 새 인스턴스를 가져온다.
모듈 범위 지정
@Inject 생성자로 선언된 바인딩의 범위를 지정하는 방법 외에도
모듈에 선언된 바인딩도 비슷한 방식으로 범위를 지정할 수 있다.
@Module
@InstallIn(FragmentComponent.class)
object FooModule {
  // 이 바인딩은 "범위 없음" 이다
  @Provides
  fun provideUnscopedBinding() = UnscopedBinding()

  // 이 바인딩은 "범위 있음" 이다
  @Provides
  @FragmentScoped
  fun provideScopedBinding() = ScopedBinding()
}
모듈에 선언된 모든 바인딩 범위가 모듈이 설치된 Component에 적용되지는 않는다.
Component에 범위 어노테이션이 달린 바인딩 선언만 범위가 지정된다.
언제 범위를 지정할까?
바인딩 범위 지정은 생성된 코드 크기와 런타임 성능 모두에 비용이 들기 때문에 범위 지정을 약간만 사용한다.
언제 바인딩 범위를 지정해야 하는지 여부를 결정하는 일반적인 규칙은 코드의 정확성에 필요한 경우에만 바인딩을 지정하는 것이다.
순수하게 성능상 이유로 바인딩 범위를 지정해야 한다고 생각되는 경우 먼저 성능이 먼저 성능이 문제인지 확인하고
Component 범위 대신 @Reavailalbe을 사용하는 것을 고려해야 하는지 확인해야 한다.
컴포넌트 기본 바인딩
각 Hilt Component는 자신의 사용자 지정 바인딩에 종속적으로 주입될 수 있는 기본 바인딩 집합과 함께 제공된다.
| Component | Default Bindings |
|---|---|
| SingletonComponent | Application |
| ActivityRetainedComponent | Application |
| ViewModelComponent | SavedStateHandle |
| ActivityComponent | Application, Activity |
| FragmentComponent | Application, Activity, Fragment |
| ViewComponent | Application, Activity, View |
| ViewWithFragmentComponent | Application, Activity, Fragment, View |
| ServiceComponent | Application, Service |
ActivityRetainedComponent는 구성 변경 전반에 걸쳐 존재하므로 생성 시 첫 번째와 소멸시 마지막으로 생성 된다.Aplication바인딩은ApplicationContext또는Application을 사용하여 사용할 수 있다.
Hilt Application
Hilt를 사용하는 모든 앱에는 @HiltAndroidApp 어노테이션이 달린 Application 클래스가 있어야 한다.@HiltAndroidApp은 Hilt Components의 코드 생성을 시작하고 생성된 Components를 사용하는 응용프로그램의 기본 클래스도 생성한다.
코드 생선은 모든 모듈에 대한 액세스 권한이 필요하므로 애플리케이션 클래스를 컴파일하는 대상에도 모든 Dagger 모듈이
전환 종속성에 있어야 한다.
다른 Hilt Android entry points와 마찬가지로 Applications도 함께 주입된다.
즉, super.onCreate()가 호출된 후 Application에서 주입된 필드를 사용할 수 있다.
@HiltAndroidApp
class MyApplication : MyBaseApplication() {
  @Inject lateinit var bar: Bar

  override fun onCreate() {
    super.onCreate() // Injection happens in super.onCreate()
    // Use bar
  }
}
Android Entry Point
Android Types
응용프로그램에서 멤버 주입을 활성화한 후에는 @AndroidEntryPoint 어노테이션을 사용하여
다른 Android 클래스에서 멤버 주입을 활성화할 수 있다.
다음 유형에서 @AndroidEntryPoins를 사용할 수 있다.
- Activity
- Fragment
- View
- Service
- BroadcastReceiver
ViewModel은 별도의 API @HiltViewModel을 통해 지원된다.
시작 시 생성 호출로 인해 ContentProvider는 직접 지원되지 않지만 EntryPoint를 통해 종속성에 액세스 할 수 있다.
@AndroidEntryPoint
class MyActivity : MyBaseActivity() {
  // Singleton 구성 요소 또는 Activity 구성 요소의 바인딩
  @Inject lateinit var bar: Bar

  override fun onCreate(savedInstanceState: Bundle?) {
    // super.onCreate()에서 주입이 수행된다
    super.onCreate()

    // Do something with bar ...
  }
}
Activity에 멤버를 주입하려면 위와 같이 어노테이션을 달아준다.
Retained Fragments
Fragment의 onCreate 메서드에서 setRainInstance(true)를 호출하면
fragment 인스턴스가 삭제 및 재생성되는 대신 구성 변경 간에 fragment 인스턴스를 유지한다.
Hilt Fragment는 Component에 대한 참조(주입을 책임짐)를 보유하며,
해당 Component는 이전 Activity 인스턴스에 대한 참조를 보유하기 때문에 절대 유지되어서는 안 된다.
또한, 범위 바인딩과 조각에 주입된 제공자는 Hilt Fragment가 보존될 경우 메모리 누수를 유발할 수 있다.
Hilt Fragment가 보존되지 않도록 하기 위해 보존된 Hilt조각이 감지될 경우
구성 변경 시 런타임 예외가 발생한다.
Hilt Activity에 첨부되더라도 Hilt가 아닌 Fragment는 보존될 수 있다.
그러나 이 Fragment의 하위 Fragment가 Hilt Fragment라면
구성 변경이 발생할 때 런타임 에러가 발생한다.
Fragment 바인딩이 있는 View
기본적으로 SingletonComponent 및 ActivityComponent 바인딩만 View에 주입할 수 있다.
View에서 Fragment 바인딩을 활성화하려면 클래스에 @WithFragmentBindings 어노테이션을 추가한다.
@AndroidEntryPoint
@WithFragmentBindings
class MyView : MyBaseView {
  // Singleton Component, Activity Component의 바인딩,
  // FragmentComponent 및 ViewComponent
  @Inject lateinit var bar: Bar

  constructor(context: Context) : super(context)
  constructor(context: Context, attrs: AttributeSet?) : super(context, attrs)

  init {
    // Do something with bar ...
  }

  override fun onFinishInflate() {
    super.onFinishInflate();

    // 팽창된 계층에서 하위 view를 찾아 할당
  }
}
Hilt View Models
Hilt ViewModel은 Hilt가 주입한 Jetpack ViewModel이다.
Hilt에 의한 ViewModel을 활성화하려면 @HiltViewModel 어노테이션을 사용한다.
 @HiltViewModel
class FooViewModel @Inject constructor(
  val handle: SavedStateHandle,
  val foo: Foo
) : ViewModel
그런 다음 @AndroidEntryPoint로 어노테이션이 달린 Activity 또는 Fragment가ViewModelProvider 또는 by viewModels() KTX 확장을 사용하여
ViewModel 인스턴스를 정상적으로 가져올 수 있다.
주의해야 할 점은, ViewModel에 @Inject 생성자가 있더라도 여러 인스턴스가 발생하므로
Dagger에서 직접 요청(ex, 필드 주입을 통해) 하는 것은 오류이다.ViewModelProvider API를 통해 ViewModel을 검색해야 한다. (Hilt 컴파일 타임에 확인된다)
View Model Scope
단일 ViewModel에 대한 종속성의 범위를 지정하려면 @ViewModelScope를 사용한다.@ViewModelScope 어노테이션을 사용하여 HiltViewModel에 주입된 모든 종속성에 걸쳐
단일 인스턴스를 제공하도록 할 수 있다.
@Module
@InstallIn(ViewModelComponent::class)
object ViewModelMovieModule {
  @Provides
  @ViewModelScoped
  fun provideRepo(handle: SavedStateHandle) =
      MovieRepository(handle.getString("movie-id"));
}

class MovieDetailFetcher @Inject constructor(
  val movieRepo: MovieRepository
)

class MoviePosterFetcher @Inject constructor(
  val movieRepo: MovieRepository
)

@HiltViewModel
class MovieViewModel @Inject constructor(
  val detailFetcher: MovieDetailFetcher,
  val posterFetcher: MoviePosterFetcher
) : ViewModel {
  init {
    // Both detailFetcher and posterFetcher will contain the same instance of
    // the MovieRepository.
  }
}
여러 ViewModel에서 한 인스턴스를 공유해야 하는 경우@ActivityRetainedScoped 또는 @Singletone을 사용하여 범위를 지정해야 한다.
Modules
Hilt Module은 설치할 Hilt Component를 결정하는 추가 @InstallIn 어노테이션이 있는 표준 Dagger 모듈이다.
Hilt Component가 생성되면 @InstallIn 어노테이션이 달린 모듈이 각각 @Component#modules 또는@Subcomponent#modules을 통해 Component 또는 하위 Component에 설치된다.
Dagger에서 처럼 모듈을 Component에 설치하면 해당 Component의 다른 바인딩이나
Component 계층구조의 하위 Component에 종속성으로 해당 바인딩에 액세스 할 수 있다.
또한 해당 @AndroidEntryPoint 클래스에서 액세스 할 수도 있다.
그리고 Component에 설치되면 해당 Component에 대한 바인딩 범위도 지정할 수 있다.
@InstallIn 사용하기
@InstallIn은 Hilt를 사용할 때 모든 Dagger 모듈에 필요하지만, 선택적으로 비활성화할 수도 있다.@InstallIn 어노테이션에 적절한 Component 유형을 전달하여 모듈을 설치할 Hilt Component를 지정한다.
@Module
@InstallIn(SingletonComponent::class) // Installs FooModule in the generate SingletonComponent.
object FooModule {
  @Provides
  fun provideBar(): Bar {...}
}
각 Component에는 Component의 수명에 대한 바인딩을 메모하는 데 사용할 수 있는
범위지정 어노테이션이 제공된다 (e.g. `@Sinlgetone)
@Module
@InstallIn(SingletonComponent::class)
object class FooModule {
  // @InstallIn(SingletonComponent.class) module providers have access to
  // the Application binding.
  @Provides
  fun provideBar(app: Application): Bar {...}
}
여러 Component에 모듈 설치
여러 Component에 모듈을 설치할 때 지켜야 할 규칙
- 모든 Component가 동일한 범위의 어노테이션을 사용하는경우에만 공급자(Providers)의 범위를 지정할 수 있다
ViewComponent및viewWithFragmentComponent는 둘 다 해당 범위의 어노테이션을 지원하므로@ViewScope가 가능- Fragment, Service에 제공된 바인딩은 표준 범위로 지정할 수 없다
- 공급자(Providers)는 모든 Component가 해당 바인딩에 액세스 할 수 있는 경우에만 바인딩을 주입할 수 있다
ViewComponent및viewWithFragmentComponent는 View를 주입할 수 있다FragmentComponent및ServiceComponent에 바인딩된 Component는 Fragment, Service를 주입할 수 없다
- 하위 Component와 상위 Component는 동일한 모듈을 설치하면 안된다.
- 상위 항목에 모듈을 설치하면 하위 항목이 해당 바인딩에 액세스 할 수 없다
Entry Point
Entry Point란?
Entry Point는 Dagger를 사용하여 종속성을 주입할 수 없는 코드에서 Dagger 제공 개체를 가져올 수 있는 경계이다.
Dagger가 관리하는 객체의 그래프에 코드가 처음 들어가는 지점이다.
Entry Point는 interface만 가능하다
언제 Entry Point가 필요할까?
아직 Hilt에서 지원되지 않으며 Dagger 개체에 액세스해야 하는 Android 구성 요소 또는 비 Dagger 라이브러리와의 인터페이스에는 Entry Point가 필요하다.
어떻게 Entry Point를 사용할까?
Entry Point 생성
- Entry Point를 만들려면 필요한 각 바인딩 유형에 대한 액세스 또는 메서드가 있는 인터페이스를 정의하고
@EntryPoint어노테이션으로 인터페이스를 표시한다 @InstallIn어노테이션을 추가하여 Entry Point를 설치할 Component를 지정한다
@EntryPoint
@InstallIn(SingletonComponent::class)
interface FooBarInterface {
  @Foo fun getBar(): Bar
}
Entry Point에 액세스 하기
Entry Point에 액세스 하려면 'Component 인스턴스로 전달되는 Entry Point 클래스' 또는 'Component 홀더 역할을 하는 @AndroidEntryPoint 객체'를 매개변수로 사용한다.
val bar = EntryPoints.get(applicationContext, FooBarInterface::class.java).getBar()모범사례 : Entry Point interface를 선언할 위치를 지정하기
Best practice
// Good
// public Dagger context에서 인스턴스화되지 않았기 때문에 @Inject를 사용하지않는다
class MyClass : NonHiltLibraryClass() {

  @EntryPoint
  @InstallIn(SingletonComponent::class)
  interface MyClassInterface {
    fun getFoo(): Foo

    fun getBar(): Bar
  }

  fun doSomething(context: Context) {
    val myClassInterface =
        EntryPoints.get(applicationContext, MyClassInterface::class.java)
    val foo = myClassInterface.getFoo()
    val bar = myClassInterface.getBar()
  }
}
Bad practice
 // Bad
@Module
@InstallIn(SingletonComponent::class)
object FooModule {
  @Provides
  fun provideFoo(): Foo {
    return Foo()
  }

  @EntryPoint
  @InstallIn(SingletonComponent::class)
  interface FooInterface {
    fun getFoo(): Foo
  }
}
Custom Components
맞춤형 Component가 필요한가요?
표준 Hilt Component가 특정 기능의 객체 수명 또는 요구와 일치하지 않은 경우 Custom Component를 사용할 수 있다.
그러나 Custom Component는 단점이 있어서 논리적으로 필요한지 고려해야 한다.
단점
- 각 Component/Scope(범위)는 인지 오버헤드를 추가한다
- Custom Component는 그래프를 복잡하게 만들 수 있다
ViewComponent의 하위 항목인 경우ViewComponent와viewWithFragmentComponent에 각가 두개의 Component를 추가해야한다
- Component에는 하나의 부모만 있을 수 있다.
- Component계층이 다이아몬드를 형성할 수 없다
- 더 많은 Component를 생성하면 다이아몬드 종속성이 필요한 상황이 발생할 수 있다
- Custom Component는 표준화에 반대한다
- Custom Component를 많이 사용할 수록 공유 라이브러리가 더 어려워진다.
위 단점을 고려하였을 때 Custom Component가 필요한지 여부를 결정하는데 아래의 요소들을 검토해야 한다
- Component에 연결된 수명(lifetime)이 잘 정의되어 있는지
- Component에 개념은 잘 이해하고 광범위하게 적용될 수 있는지
- Hilt Component는 앱에 전체적으로 적용되므로 어디서나 개념을 적용할 수 있어야 한다
Custom Component 제한
Custom Component 정의에는 현재 몇 가지 제한이 있다
- Component는 Singleton Component의 직접 또는 간접 하위항목이여야한다
- 표준 Component사이에 Component를 삽입할 수 없다
ActivityComponent와FragmentComponent사이에 Component를 추가할 수 없다
Custom Hilt Component 추가하기
Custom Hilt Component를 생성하려면 @DefineComponent 어노테이션이 달린 클래스를 생성한다.
이 클래스는 @InstallIn 어노테이선에 사용하는 클래스가 된다.
Component의 상위는 @DefineComponent 어노테이션에 정의되어 있어야 한다.@DefineComponent 클래스에 범위 지정 개체를 이 Component로 지정할 수 있는 범위 어노테이션도 추가할 수 있다.
@DefineComponent(parent = SingletonComponent::class)
interface MyCustomComponent
빌더 인터페이스도 정의해야 한다. 빌더 인터페이스가 없는 경우 Component를 구성할 방법이 없으므로
Component가 생성되지 않는다. 이 인터페이스는 상위 Component에서 주입이 가능하며
Component의 새 인스턴스를 만드는 인터페이스가 된다.
빌더 인터페이스는 @DefineComponent. Builder 어노테이션을 사용하여 정의한다.
빌더에는 @DefineComponent 유형을 반환하는 메서드가 있어야 한다.
@DefineComponent.Builder
interface MyCustomComponentBuilder {
  fun fooSeedData(@BindsInstance foo: Foo): MyCustomComponentBuilder
  fun build(): MyCustomComponent
}
과도한 종속성을 방지하는 것과 동일한 이유로 @DefineComponent 인터페이스 에는 메서드가 허용되지 않는다.
대신 Entry Point를 통해 Dagger 객체에 액세스 해야 한다.
@EntryPoint
@InstallIn(MyCustomComponent::class)
interface MyCustomEntryPoint {
  fun getBar(): Bar
}

class CustomComponentManager @Inject constructor(
    componentBuilder: MyCustomComponentBuilder) {

  fun doSomething(foo: Foo) {
    val component = componentBuilder.fooSeedData(foo).build();
    val bar = EntryPoints.get(component, MyCustomEntryPoint::class.java).getBar()

    // Don't forget to hold on to the component instance if you need to!
  }
댓글