ConstraintLayout 알아보기
ConstraintLayout에 대하여 샘플 코드와 함께 알아보도록 하겠습니다.
목차
ConstraintLayout이란?
복잡한 레이아웃을 단순한 계층 구조를 이용하여 표현할 수 있는 ViewGroup입니다.
즉 복잡한 계층구조로 레이아웃을 구성하는 방식에서 자유로워질 수 있습니다.
형제 View들과 관계를 정의해서 레이아웃을 구성한다는 점이 RelativeLayout과 비슷하지만,
보다 유연하고 다양한 기능을 제공합니다.
ConstrinatLayout을 사용하면 어떤점이 좋을까??
- 복잡한레이아웃 계측구조를 단순히 구성하여 작성할 수 있습니다.
- 자식뷰 간의 상호관계를 정의가능합니다
ex) 두 View를 위 아래로 컨테이너 중앙에 배치하기등
프로젝트에 설정하기
프로젝트에서 ConstraintLayout을 사용하려면 아래와 같이 추가하여 줍니다.
보통은 프로젝트를 생성하면 기본으로 implementation 되어있는것 같습니다.
repositories {
        google()
}
dependencies {
    implementation 'com.android.support.constraint:constraint-layout:1.1.2'
}
Constraint(제약조건)
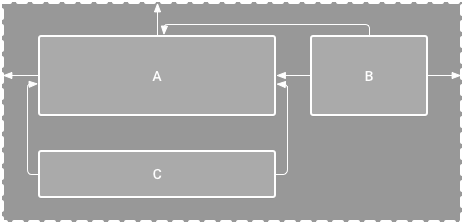
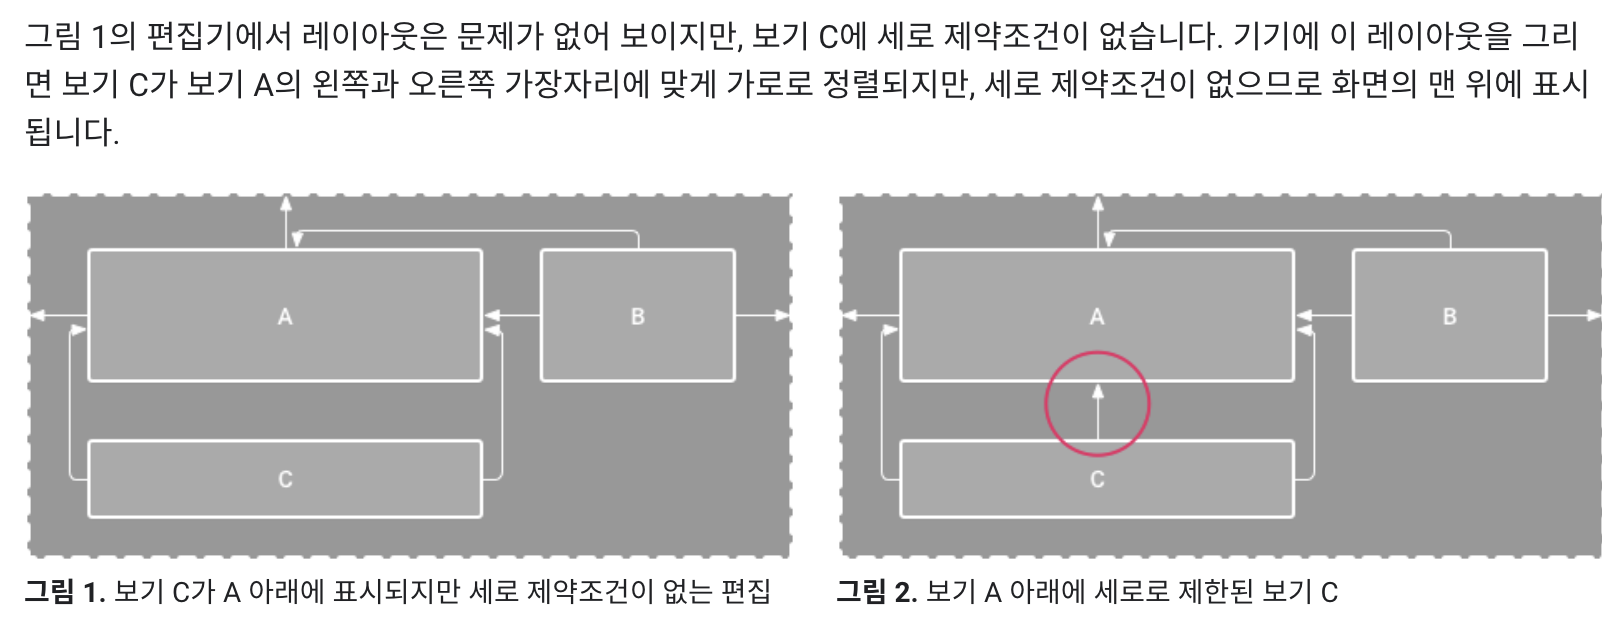
ConstraintLayout에서 View의 위치를 정의하려면 보기의 가로 및 세로 제약조건을 각각 하나 이상 추가해야 합니다.
각 제약조건은 세로 또는 가로 축을 따라 View의 위치를 정의하므로, 각 View에는 축마다 하나 이상의 제약조건이 있어야 합니다.
Constraint 제약조건
- Constraintlayout에서 자식 뷰의 위치를 잡는 기준
- 다른뷰나 부모 레이아웃과의 정렬조건 / 연결관계를 나타냄
- layout_constraint[기준1]_to[기준2]of ="[viewId || parent]" 으로 xml text 작성
- start, end 속성은 left, right 속성보다 우선됨
- Top/Bottom/Start/End를 모두 선언해야하는 것은 아님
- 하지만 체인등 다른 기능 사용시 예상치 못한 동작이 발생할 수 있음.
왠만하면은 상, 하 , 좌, 우 모두 제약조건을 설정해주는것을 권장합니다.
ex1) constraint.xml
<?xml version="1.0" encoding="utf-8"?>
<androidx.constraintlayout.widget.ConstraintLayout xmlns:android="http://schemas.android.com/apk/res/android"
    xmlns:app="http://schemas.android.com/apk/res-auto"
    android:orientation="vertical"
    android:layout_width="match_parent"
    android:layout_height="match_parent">


    <Button
        android:id="@+id/btn_A"
        android:layout_width="wrap_content"
        android:layout_height="wrap_content"
        android:text="A"
        app:layout_constraintStart_toStartOf="parent"
        app:layout_constraintTop_toTopOf="parent"
        app:layout_constraintBottom_toBottomOf="parent"
        app:layout_constraintEnd_toStartOf="@id/btn_B"/>

    <Button
        android:id="@+id/btn_B"
        android:layout_width="wrap_content"
        android:layout_height="wrap_content"
        android:text="B"
        app:layout_constraintBottom_toBottomOf="parent"
        app:layout_constraintEnd_toEndOf="parent"
        app:layout_constraintStart_toEndOf="@id/btn_A"
        app:layout_constraintTop_toTopOf="parent" />

</androidx.constraintlayout.widget.ConstraintLayout>
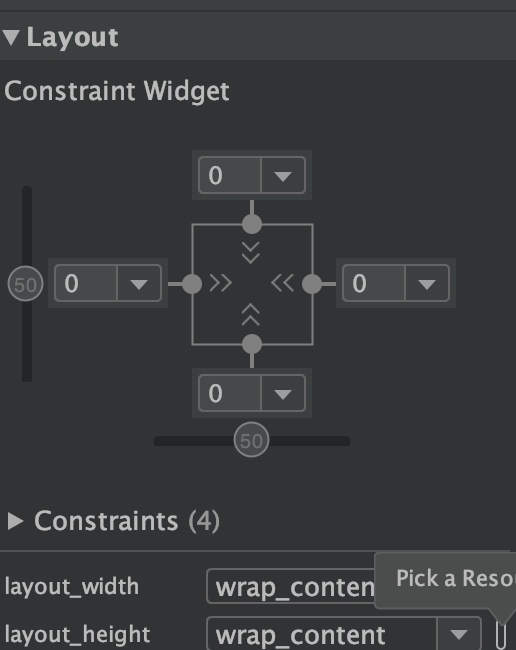
View 크기
View 크기 - android:layout_width / layout_height 속성 사용
1 .고정 ex) android: layout_width="100dp"

2.wrap_content

3. match_constraint (0dp)

디자인 탭에서 아래와같이 확인도 가능합니다.
- match_parent가 아닌 match_constraint
- 크기는 0dp 로 constraint에 꽉차게 크기를 맞춤
- match_constraint라는 속성값은 없다! -> 0dp라 쓰고 match_constraint라 읽음
- 제대로 동작하려면 양쪽 constraint 를 모두 선언해주어야함 (주의필요!!)match_parent는 사용할수 없습니다.
ex) view_size_1
<?xml version="1.0" encoding="utf-8"?>
<androidx.constraintlayout.widget.ConstraintLayout xmlns:android="http://schemas.android.com/apk/res/android"
    xmlns:app="http://schemas.android.com/apk/res-auto"
    android:layout_width="match_parent"
    android:layout_height="match_parent"
    android:orientation="vertical">

    <Button
        android:layout_width="100dp"
        android:layout_height="0dp"
        android:text="고정 View Size"
        app:layout_constraintBottom_toBottomOf="parent"
        app:layout_constraintEnd_toEndOf="parent"
        app:layout_constraintStart_toStartOf="parent"
        app:layout_constraintTop_toTopOf="parent" />

</androidx.constraintlayout.widget.ConstraintLayout>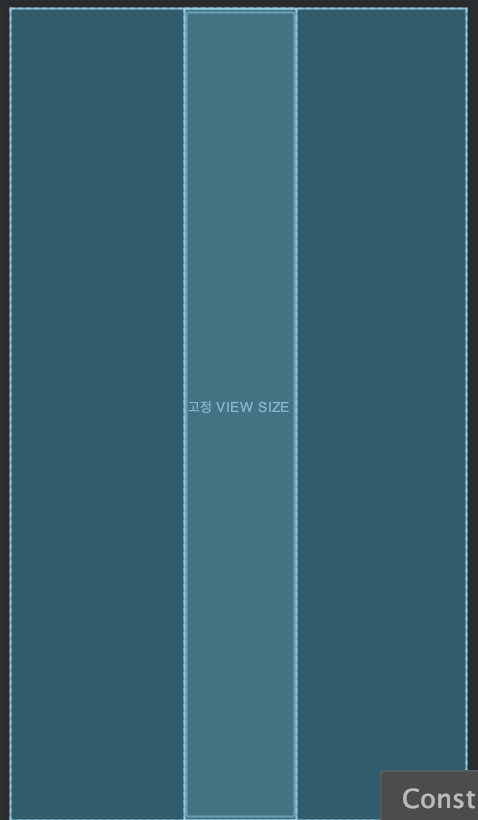
View 크기 - Percent size
- 부모의 뷰 크기에 비례하여 뷰의 크기를 결정합니다.
- 단 Padding은 제외한 크기입니다.
- layout_width는 match_constrinat로 선언
- layout_constraint[width || height ]_default : 대상 축의 constraint의 계산방식
- spread : constraint 영역에 맞춤 (기본동작)
- wrap : 뷰 크기에 맞춤 (자식뷰의 크기)
- percent : constraint[ width || height]_percent 속성에 선언한 비율에 맞춤
ex) view_size_2.xml
<?xml version="1.0" encoding="utf-8"?>
<androidx.constraintlayout.widget.ConstraintLayout xmlns:android="http://schemas.android.com/apk/res/android"
    xmlns:app="http://schemas.android.com/apk/res-auto"
    android:layout_width="300dp"
    android:layout_height="300dp"
    android:orientation="vertical">

    <TextView
        android:layout_width="0dp"
        android:layout_height="0dp"
        app:layout_constraintWidth_default="percent"
        app:layout_constraintWidth_percent="0.4"
        ... />

</androidx.constraintlayout.widget.ConstraintLayout>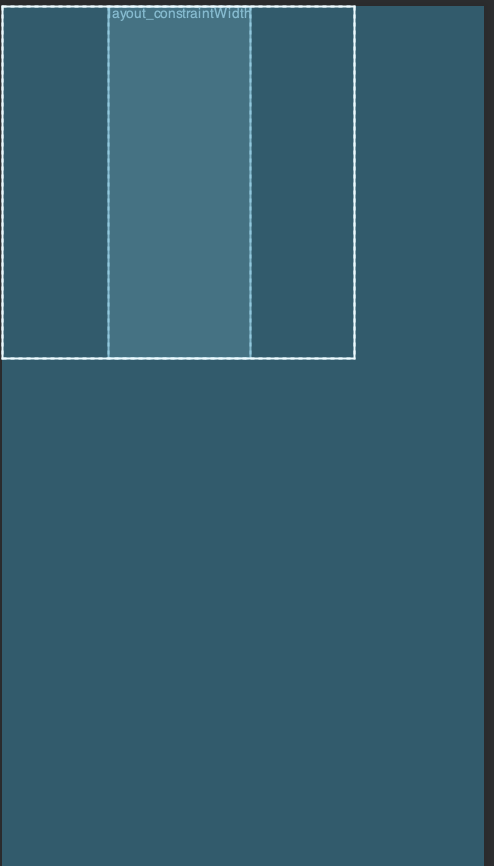
View 크기 - 가로 / 세로 비율 지정
- demensionRatio : 뷰의 가로 / 세로 비율 결정
- app:layout_constraintDimensionRatio = "1" -> 가로 /세로 = 1/1
- app:layout_constraintDimensionRatio ="1:1 -> 가로 : 세로 1:1
- 적어도 한 방향은 match_constraint 이여야 함
- 두 방향 모두 match_constraint 일 경우 , 비율에 맞춰 constraint 내에서 가장 큰 크기로 결정
ex) view_size_3
<androidx.constraintlayout.widget.ConstraintLayout xmlns:android="http://schemas.android.com/apk/res/android"
    android:layout_width="match_parent"
    android:layout_height="match_parent"
    xmlns:app="http://schemas.android.com/apk/res-auto">

    <TextView
        android:layout_width="150dp"
        android:layout_height="0dp"
        app:layout_constraintDimensionRatio="1:1"
        app:layout_constraintStart_toStartOf="parent"
        app:layout_constraintEnd_toEndOf="parent"
        app:layout_constraintTop_toTopOf="parent"
        app:layout_constraintBottom_toBottomOf="parent"/>

</androidx.constraintlayout.widget.ConstraintLayout>
ex) view_size_4
<androidx.constraintlayout.widget.ConstraintLayout xmlns:android="http://schemas.android.com/apk/res/android"
    android:layout_width="match_parent"
    android:layout_height="match_parent"
    xmlns:app="http://schemas.android.com/apk/res-auto">

    <TextView
        android:layout_width="0dp"
        android:layout_height="0dp"
        app:layout_constraintDimensionRatio="2"
        android:text="width height all match_constraint and demensionRatio 2"
        app:layout_constraintStart_toStartOf="parent"
        app:layout_constraintEnd_toEndOf="parent"
        app:layout_constraintTop_toTopOf="parent"
        app:layout_constraintBottom_toBottomOf="parent"/>

</androidx.constraintlayout.widget.ConstraintLayout>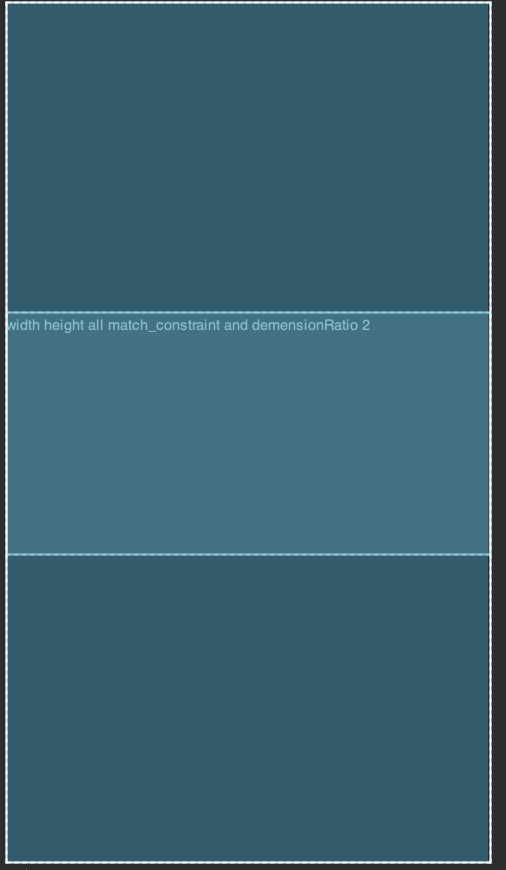
ex) view_size_5
<androidx.constraintlayout.widget.ConstraintLayout xmlns:android="http://schemas.android.com/apk/res/android"
    android:layout_width="match_parent"
    android:layout_height="match_parent"
    xmlns:app="http://schemas.android.com/apk/res-auto">

    <TextView
        android:layout_width="wrap_content"
        android:layout_height="0dp"
        app:layout_constraintDimensionRatio="1:2"
        android:text="wrap_content_dimensionRatio 1:2"
        app:layout_constraintStart_toStartOf="parent"
        app:layout_constraintEnd_toEndOf="parent"
        app:layout_constraintTop_toTopOf="parent"
        app:layout_constraintBottom_toBottomOf="parent"/>

</androidx.constraintlayout.widget.ConstraintLayout>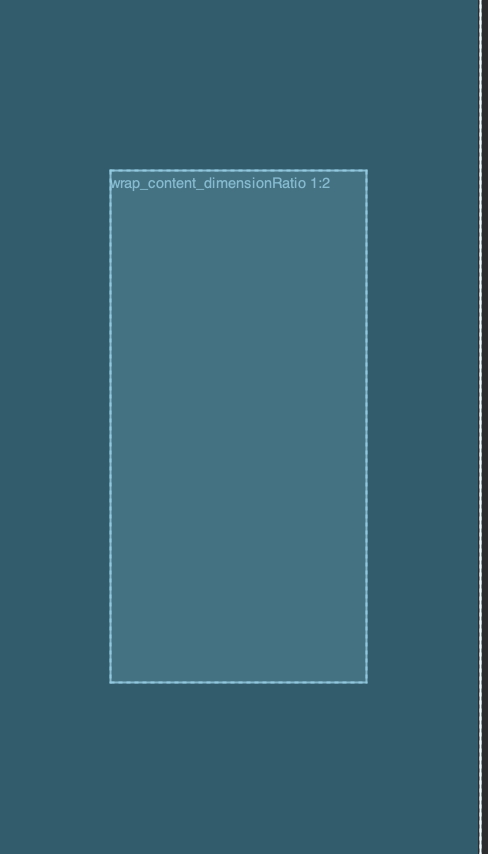
- 명시적으로 비율을 적용할 축을 지정할 수 있음 : (W|H,)[비율]
- W : 높이에 맞춰 폭을 조정
- H : 폭에 맞춰 높이를 조정
- 폭 match_constraint, 높이 match_constraint 인 경우
- H,1:2 : 폭을 constraint 에 맞춰 설정한 후 , 비율에 따라 높이를 결정 (case1)
- W,1:2 : 높이를 constraint에 맞춰 설정한 후 , 비율에 따라 폭을 결정 (case2)
- 폭 wrap_content, 높이 match_constraint인 경우
- H,1:2 : 폭을 wrap_content에 맞춰 설정한 후, 비율에 따라 높이를 결정 (case3)
- W,1:2 : 폭이 wrap_content로 결정되어 버렷기 때문에 역으로 2:1 비율이 설정되어짐 (case4)
ex ) view_size_6.xml (case2)
<androidx.constraintlayout.widget.ConstraintLayout xmlns:android="http://schemas.android.com/apk/res/android"
    android:layout_width="300dp"
    android:layout_height="300dp"
    xmlns:app="http://schemas.android.com/apk/res-auto">

    <TextView
        android:layout_width="0dp"
        android:layout_height="0dp"
        app:layout_constraintDimensionRatio="W,1:2"
        android:text="dimensionRatio W,1:2"
        app:layout_constraintStart_toStartOf="parent"
        app:layout_constraintEnd_toEndOf="parent"
        app:layout_constraintTop_toTopOf="parent"
        app:layout_constraintBottom_toBottomOf="parent"/>

</androidx.constraintlayout.widget.ConstraintLayout>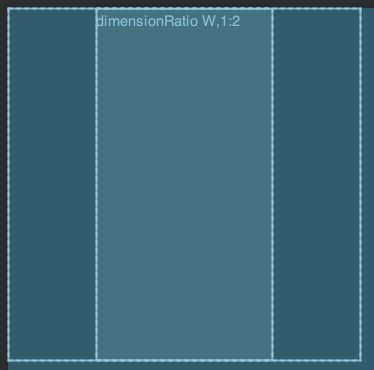
ex ) view_size_7.xml (case1)
<androidx.constraintlayout.widget.ConstraintLayout xmlns:android="http://schemas.android.com/apk/res/android"
    android:layout_width="300dp"
    android:layout_height="300dp"
    xmlns:app="http://schemas.android.com/apk/res-auto">

    <TextView
        android:layout_width="0dp"
        android:layout_height="0dp"
        android:text="dimensionRatio H,1:2"
        app:layout_constraintDimensionRatio="H,1:2"
        app:layout_constraintBottom_toBottomOf="parent"
        app:layout_constraintEnd_toEndOf="parent"
        app:layout_constraintStart_toStartOf="parent"
        app:layout_constraintTop_toTopOf="parent" />

</androidx.constraintlayout.widget.ConstraintLayout>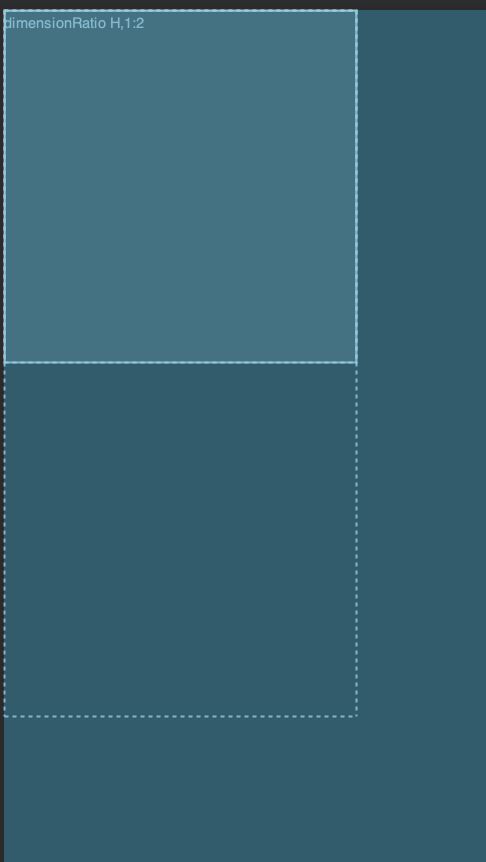
ex ) view_size_8.xml (case4)
<androidx.constraintlayout.widget.ConstraintLayout xmlns:android="http://schemas.android.com/apk/res/android"
    android:layout_width="match_parent"
    android:layout_height="match_parent"
    xmlns:app="http://schemas.android.com/apk/res-auto">

    <TextView
        android:layout_width="wrap_content"
        android:layout_height="0dp"
        app:layout_constraintDimensionRatio="W,1:2"
        android:text="dimensionRatio W,1:2"
        app:layout_constraintStart_toStartOf="parent"
        app:layout_constraintEnd_toEndOf="parent"
        app:layout_constraintTop_toTopOf="parent"
        app:layout_constraintBottom_toBottomOf="parent"/>
    <!-- 2:1이 되버림-->

</androidx.constraintlayout.widget.ConstraintLayout>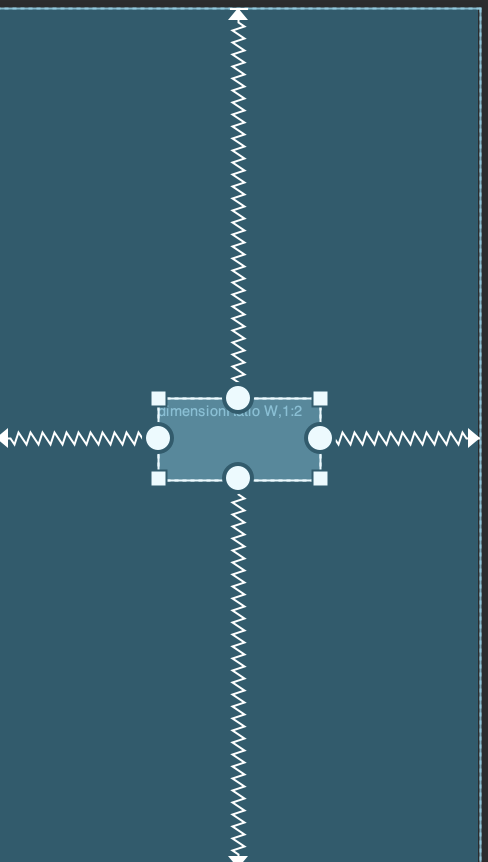
ex ) view_size_9.xml (case3)
<androidx.constraintlayout.widget.ConstraintLayout xmlns:android="http://schemas.android.com/apk/res/android"
    android:layout_width="match_parent"
    android:layout_height="match_parent"
    xmlns:app="http://schemas.android.com/apk/res-auto">

    <TextView
        android:layout_width="wrap_content"
        android:layout_height="0dp"
        app:layout_constraintDimensionRatio="H,1:2"
        android:text="dimensionRatio H,1:2"
        app:layout_constraintStart_toStartOf="parent"
        app:layout_constraintEnd_toEndOf="parent"
        app:layout_constraintTop_toTopOf="parent"
        app:layout_constraintBottom_toBottomOf="parent"/>

</androidx.constraintlayout.widget.ConstraintLayout>
View 크기 - 최소 / 최대
- 최소 / 최대 크기 지정 :app:layout_constraintWidth_[min|max]="size"
- android:minWidth와 다른점
- wrap_content 일땐 android:[min | max]width 적용
- match_constraint 일땐 app:layout_constraintWidth _[min|max]적용
ex )view_size_10.xml
<androidx.constraintlayout.widget.ConstraintLayout xmlns:android="http://schemas.android.com/apk/res/android"
    android:layout_width="match_parent"
    android:layout_height="match_parent"
    xmlns:app="http://schemas.android.com/apk/res-auto">

    <TextView
        android:layout_width="wrap_content"
        android:minWidth="100dp"
        app:layout_constraintWidth_min="200dp"
        android:layout_height="wrap_content"
        android:text="hello world"
        app:layout_constraintStart_toStartOf="parent"
        app:layout_constraintEnd_toEndOf="parent"
        app:layout_constraintTop_toTopOf="parent"
        app:layout_constraintBottom_toBottomOf="parent"/>

</androidx.constraintlayout.widget.ConstraintLayout>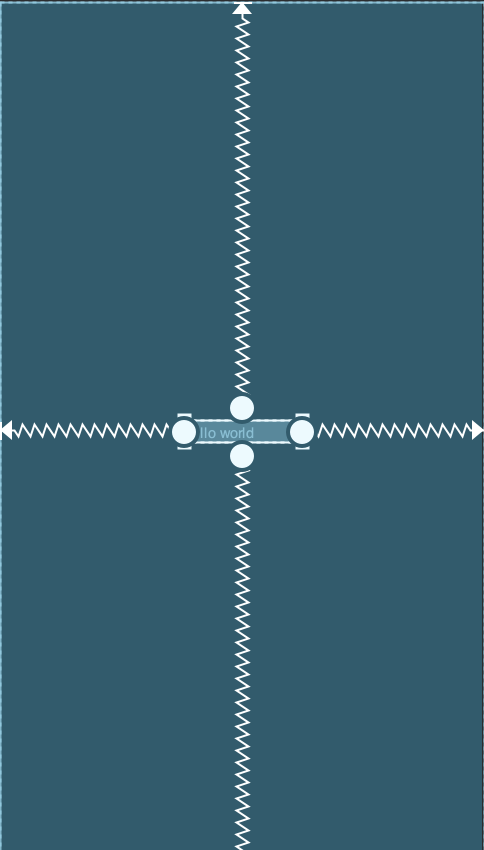
ex)view_size_11.xml
<androidx.constraintlayout.widget.ConstraintLayout xmlns:android="http://schemas.android.com/apk/res/android"
    android:layout_width="match_parent"
    android:layout_height="match_parent"
    xmlns:app="http://schemas.android.com/apk/res-auto">

    <TextView
        android:layout_width="0dp"
        android:minWidth="100dp"
        app:layout_constraintWidth_max="200dp"
        android:layout_height="wrap_content"
        android:text="hello world"
        app:layout_constraintStart_toStartOf="parent"
        app:layout_constraintEnd_toEndOf="parent"
        app:layout_constraintTop_toTopOf="parent"
        app:layout_constraintBottom_toBottomOf="parent"/>

</androidx.constraintlayout.widget.ConstraintLayout>
위치 지정
위치지정 - Guideline(가이드라인)
- android.support.constraint.Guideline
- 가로 또는 세로 축 방향을 가진 가상의 뷰
- 부모 뷰의 특정 위치를 기준점으로 삼을 때 사용
- 축 , 위치 값을 속성으로 가짐
- 축 : android:orientation="[vertical|horizontal]"
- 위치
- app:layout_constraintGuide_begin : 시작 지점으로 부터의 거리
- app:layout_constraintGuide_end : 끝 지점으로 부터의 거리app:layout_constraintGuide_percent : 시작 지점으로 부터의 % 위치
ex) location_guildline.xml
<androidx.constraintlayout.widget.ConstraintLayout xmlns:android="http://schemas.android.com/apk/res/android"
    xmlns:app="http://schemas.android.com/apk/res-auto"
    android:layout_width="match_parent"
    android:layout_height="match_parent"
    android:orientation="vertical">

    <androidx.constraintlayout.widget.Guideline
        android:id="@+id/gd_left"
        android:layout_width="wrap_content"
        android:layout_height="0dp"
        android:orientation="vertical"
        app:layout_constraintGuide_begin="100dp" />

    <androidx.constraintlayout.widget.Guideline
        android:id="@+id/gd_right"
        android:layout_width="wrap_content"
        android:layout_height="0dp"
        android:orientation="vertical"
        app:layout_constraintGuide_end="100dp" />

    <androidx.constraintlayout.widget.Guideline
        android:id="@+id/gd_bottom"
        android:layout_width="wrap_content"
        android:layout_height="wrap_content"
        android:orientation="horizontal"
        app:layout_constraintGuide_percent="0.8" />

    <TextView
        android:layout_width="0dp"
        android:layout_height="0dp"
        android:text="hello world"
        app:layout_constraintBottom_toBottomOf="@id/gd_bottom"
        app:layout_constraintEnd_toEndOf="@id/gd_right"
        app:layout_constraintStart_toStartOf="@id/gd_left"
        app:layout_constraintTop_toTopOf="parent" />

</androidx.constraintlayout.widget.ConstraintLayout>
위치지정 - bias
- bias : (constraint 영역 크기 - 뷰크기 ) 를 분배하는 비율
- app:layout_constraintHorizontal_bias="0~1"
- 0 : 왼쪽에 붙이기
- 1 : 오른쪽에 붙이기
- 0.5 : 중간에 위치 (기본값)
- app:layout_constraintHorizontal_bias="0~1"
ex) location_bias.xml
<androidx.constraintlayout.widget.ConstraintLayout xmlns:android="http://schemas.android.com/apk/res/android"
    android:layout_width="match_parent"
    android:layout_height="match_parent"
    xmlns:app="http://schemas.android.com/apk/res-auto"
    android:orientation="vertical">

    <TextView
        android:layout_width="wrap_content"
        android:layout_height="wrap_content"
        android:text="horizontal_bias_0"
        app:layout_constraintHorizontal_bias="0"
        app:layout_constraintStart_toStartOf="parent"
        app:layout_constraintEnd_toEndOf="parent"
        app:layout_constraintTop_toTopOf="parent"
        app:layout_constraintBottom_toBottomOf="parent"/>

    <TextView
        android:layout_width="wrap_content"
        android:layout_height="wrap_content"
        android:text="horizontal_bias_1"
        app:layout_constraintHorizontal_bias="1"
        app:layout_constraintStart_toStartOf="parent"
        app:layout_constraintEnd_toEndOf="parent"
        app:layout_constraintTop_toTopOf="parent"
        app:layout_constraintBottom_toBottomOf="parent"/>

    <TextView
        android:layout_width="wrap_content"
        android:layout_height="wrap_content"
        android:text="vertical_bias_0"
        app:layout_constraintVertical_bias="0"
        app:layout_constraintStart_toStartOf="parent"
        app:layout_constraintEnd_toEndOf="parent"
        app:layout_constraintTop_toTopOf="parent"
        app:layout_constraintBottom_toBottomOf="parent"/>

    <TextView
        android:layout_width="wrap_content"
        android:layout_height="wrap_content"
        android:text="vertical_bias_1"
        app:layout_constraintVertical_bias="1"
        app:layout_constraintStart_toStartOf="parent"
        app:layout_constraintEnd_toEndOf="parent"
        app:layout_constraintTop_toTopOf="parent"
        app:layout_constraintBottom_toBottomOf="parent"/>

</androidx.constraintlayout.widget.ConstraintLayout>
여러개의 뷰
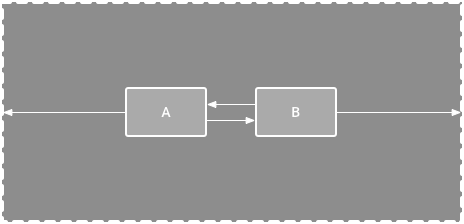
여러개의 뷰 - 체인
- 서로 연결되어 그룹으로 동작하는 뷰의 묶음
- 체인으로 연결된 뷰 끼리도 체인이 연결된 방향으로만 그룹으로 동작함
- 생성 조건 : 마주보는 뷰끼리 마주보는 방향으로 서로 constraint를 설정함
-
체인 스타일의 종류

-
체인 종류
-
Sread Chain: View가 균등하게 분산됩니다(여백을 처리한 후). 이는 기본값입니다.
-
Spread Inside Chain: 첫 번째 View와 마지막 View는 체인의 각 끝에 있는 제약조건에 고정되고 나머지 View는 균등하게 분산됩니다.
-
Weighted Chain: 체인이 넓히기 또는 내부에서 넓히기로 설정되면 하나 이상의 View를 '제약조건과 일치'로 설정하여 나머지 공간을 채울 수 있습니다(0dp). 기본적으로 공간은 '제약조건과 일치'로 설정된 각 View 사이에 균등하게 분배되지만, layout_constraintHorizontal_weight 및 layout_constraintVertical_weight 속성을 사용하여 각 View에 중요도 가중치를 할당할 수 있습니다. 선형 레이아웃의 layout_weight와 작동 방식이 동일합니다. 따라서 가중치가 가장 높은 View에 가장 많은 공간이 지정되고, 가중치가 동일한 View에는 동일한 크기의 공간이 지정됩니다.
-
Packed Chain: View가 여백을 제외한 간격 없이 배치됩니다. 체인의 헤드 보기 편향을 변경하여 전체 체인의 편향을 좌우 또는 상하로 조정할 수 있습니다.
-
- 체인 종류 별 설정 방법
- Spread
- HEAD에 app:layout_constraintHorizontal_chainStyle="spread" 선언
- Spread_Inside
- HEAD에 app:layout_constraintHorizontal_chainStyle="spread_inside"선언
- Weighted
- match_constraint인 뷰가 포함된 체인의 뷰에
- app:layout_constraintHorizontal_weight 속성 선언
- Packed
- HEAD에 app:layout_constraintHorizontal_chainSytle="packed" 선언
- Spread
- 체인 HEAD : 위치 상 체인의 가장 앞쪽 (왼쪽 혹은 윗쪽)에 위치한 뷰
Spread 체인
- (체인의 constraint 영역 - View 크기의 합) 을 균등 분할하여 배치
- 체인 바깥 마진은 constraint 영역에서 제외
- 체인 안쪽 마진은 마진을 가진 뷰의 크기에 합산
ex) chain_spread.xml
<androidx.constraintlayout.widget.ConstraintLayout xmlns:android="http://schemas.android.com/apk/res/android"
    xmlns:app="http://schemas.android.com/apk/res-auto"
    android:layout_width="match_parent"
    android:layout_height="match_parent"
    android:orientation="vertical">

    <Button
        android:id="@+id/btn_a"
        android:layout_width="wrap_content"
        android:layout_height="wrap_content"
        android:text="ButtonA"
        android:layout_marginLeft="40dp"
        app:layout_constraintBottom_toBottomOf="parent"
        app:layout_constraintEnd_toStartOf="@id/btn_b"
        app:layout_constraintHorizontal_chainStyle="spread"
        app:layout_constraintStart_toStartOf="parent"
        app:layout_constraintTop_toTopOf="parent" />

    <Button
        android:id="@+id/btn_b"
        android:layout_width="wrap_content"
        android:layout_height="wrap_content"
        android:text="ButtonB"
        android:layout_marginLeft="20dp"
        app:layout_constraintBottom_toBottomOf="parent"
        app:layout_constraintEnd_toEndOf="parent"
        app:layout_constraintHorizontal_chainStyle="spread"
        app:layout_constraintStart_toEndOf="@id/btn_a"
        app:layout_constraintTop_toTopOf="parent" />

</androidx.constraintlayout.widget.ConstraintLayout>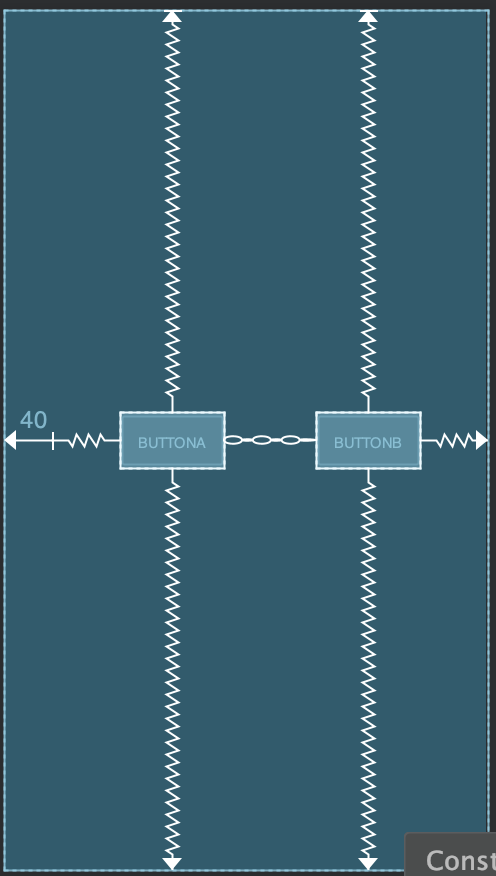
Spread_Inside 체인
-
체인의 양 끝 뷰를 constraint영역의 양 끝에 배치하고, 나머지 뷰를 남는 공간에 균등 분할하여 배치
<androidx.constraintlayout.widget.ConstraintLayout xmlns:android="http://schemas.android.com/apk/res/android"
    xmlns:app="http://schemas.android.com/apk/res-auto"
    android:layout_width="match_parent"
    android:layout_height="match_parent"
    android:orientation="vertical">

    <Button
        android:id="@+id/btn_a"
        android:layout_width="wrap_content"
        android:layout_height="wrap_content"
        android:text="ButtonA"
        android:layout_marginLeft="20dp"
        app:layout_constraintHorizontal_chainStyle="spread_inside"
        app:layout_constraintBottom_toBottomOf="parent"
        app:layout_constraintEnd_toStartOf="@id/btn_b"
        app:layout_constraintStart_toStartOf="parent"
        app:layout_constraintTop_toTopOf="parent" />

    <Button
        android:id="@+id/btn_b"
        android:layout_width="wrap_content"
        android:layout_height="wrap_content"
        android:text="ButtonB"
        android:layout_marginRight="20dp"
        app:layout_constraintBottom_toBottomOf="parent"
        app:layout_constraintEnd_toEndOf="parent"
        app:layout_constraintHorizontal_chainStyle="spread"
        app:layout_constraintStart_toEndOf="@id/btn_a"
        app:layout_constraintTop_toTopOf="parent" />

</androidx.constraintlayout.widget.ConstraintLayout>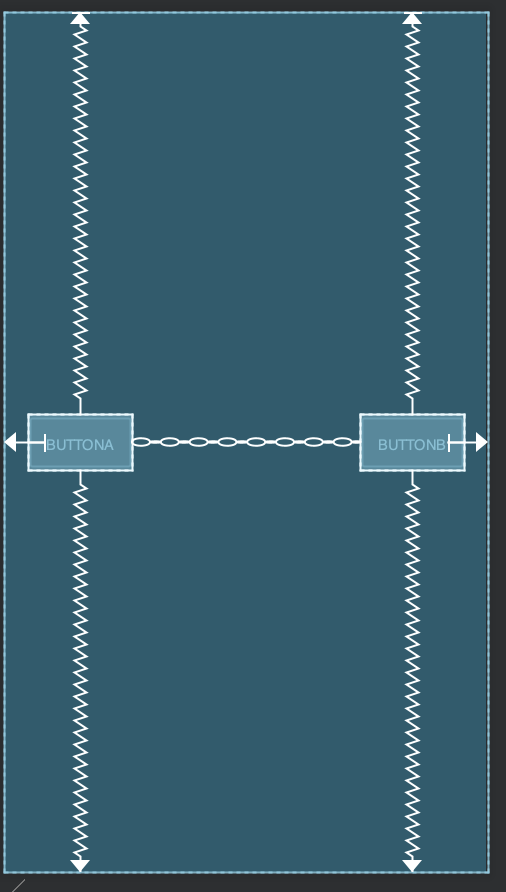
Packed 체인
- 체인을 구성하는 각 뷰를 밀착하여 배열
- (constraint 영역) - (뷰 폭의 합) 을 bias에 따라 분배
<androidx.constraintlayout.widget.ConstraintLayout xmlns:android="http://schemas.android.com/apk/res/android"
    xmlns:app="http://schemas.android.com/apk/res-auto"
    android:layout_width="match_parent"
    android:layout_height="match_parent"
    android:orientation="vertical">

    <Button
        android:id="@+id/btn_a"
        android:layout_width="wrap_content"
        android:layout_height="wrap_content"
        android:text="ButtonA"
        app:layout_constraintHorizontal_chainStyle="packed"
        app:layout_constraintBottom_toBottomOf="parent"
        app:layout_constraintEnd_toStartOf="@id/btn_b"
        app:layout_constraintStart_toStartOf="parent"
        app:layout_constraintTop_toTopOf="parent" />

    <Button
        android:id="@+id/btn_b"
        android:layout_width="wrap_content"
        android:layout_height="wrap_content"
        android:text="ButtonB"
        android:layout_marginRight="20dp"
        android:layout_marginLeft="20dp"
        app:layout_constraintBottom_toBottomOf="parent"
        app:layout_constraintEnd_toEndOf="parent"
        app:layout_constraintHorizontal_chainStyle="spread"
        app:layout_constraintStart_toEndOf="@id/btn_a"
        app:layout_constraintTop_toTopOf="parent" />

</androidx.constraintlayout.widget.ConstraintLayout>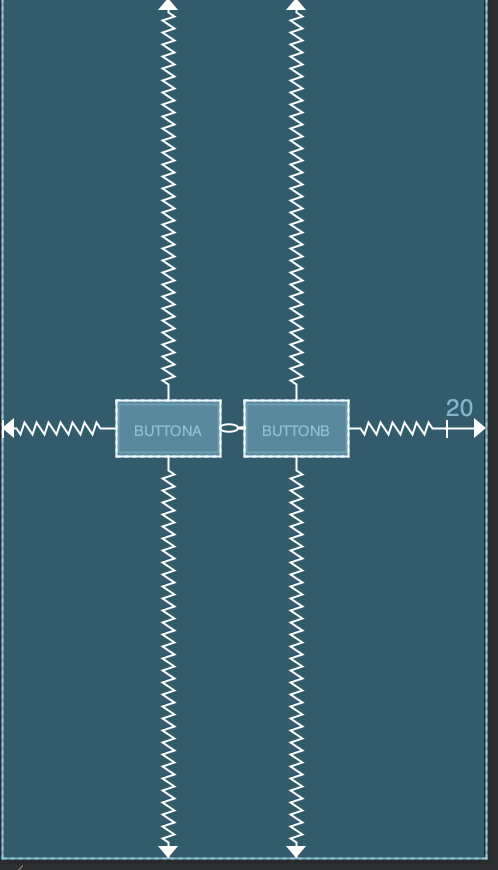
Weighted 체인
- 크기가 match_constraint인 뷰가 하나 이상 포함된 체인
- match_constraint 뷰에 app:layout_constraintHorizontal_weight 속성으로 비율을 지정
- 주의 : 모든 match_constraint 뷰에 빠짐없이 weight 속성을 지정해야함!
ex) chain_weighted.xml
<androidx.constraintlayout.widget.ConstraintLayout xmlns:android="http://schemas.android.com/apk/res/android"
    xmlns:app="http://schemas.android.com/apk/res-auto"
    android:layout_width="match_parent"
    android:layout_height="match_parent"
    android:orientation="vertical">

    <Button
        android:id="@+id/btn_a"
        android:layout_width="0dp"
        android:layout_height="wrap_content"
        android:text="ButtonA"
        app:layout_constraintHorizontal_weight="2"
        app:layout_constraintBottom_toBottomOf="parent"
        app:layout_constraintEnd_toStartOf="@id/btn_b"
        app:layout_constraintStart_toStartOf="parent"
        app:layout_constraintTop_toTopOf="parent" />

    <Button
        android:id="@+id/btn_b"
        android:layout_width="0dp"
        android:layout_height="wrap_content"
        android:text="ButtonB"
        android:layout_marginRight="10dp"
        android:layout_marginLeft="20dp"
        app:layout_constraintHorizontal_weight="1"
        app:layout_constraintBottom_toBottomOf="parent"
        app:layout_constraintEnd_toEndOf="parent"
        app:layout_constraintStart_toEndOf="@id/btn_a"
        app:layout_constraintTop_toTopOf="parent" />

</androidx.constraintlayout.widget.ConstraintLayout>
Barrier
- 여러 뷰의 가장자리 위치에 만드는 가상의 뷰
- 복잡한 양식 등을 만드는데 활용할 수 있습니다.
ex)barrier.xml
<androidx.constraintlayout.widget.ConstraintLayout xmlns:android="http://schemas.android.com/apk/res/android"
    xmlns:app="http://schemas.android.com/apk/res-auto"
    android:layout_width="match_parent"
    android:layout_height="match_parent"
    android:orientation="vertical">

    <TextView
        android:id="@+id/tv1"
        android:layout_width="wrap_content"
        android:layout_height="wrap_content"
        android:layout_margin="8dp"
        android:text="tv1"
        app:layout_constraintBottom_toBottomOf="parent"
        app:layout_constraintEnd_toEndOf="parent"
        app:layout_constraintHorizontal_bias="0"
        app:layout_constraintStart_toStartOf="parent"
        app:layout_constraintTop_toTopOf="parent"
        app:layout_constraintVertical_bias="0" />

    <TextView
        android:id="@+id/tv2"
        android:layout_width="wrap_content"
        android:layout_height="wrap_content"
        android:layout_margin="8dp"
        android:text="tv2"
        app:layout_constraintBottom_toBottomOf="parent"
        app:layout_constraintEnd_toEndOf="parent"
        app:layout_constraintHorizontal_bias="0"
        app:layout_constraintStart_toStartOf="parent"
        app:layout_constraintTop_toBottomOf="@id/tv1"
        app:layout_constraintVertical_bias="0" />

    <androidx.constraintlayout.widget.Barrier
        android:id="@+id/br_label"
        android:layout_width="0dp"
        android:layout_height="0dp"
        app:barrierDirection="end"
        app:constraint_referenced_ids="tv1,tv2" />

</androidx.constraintlayout.widget.ConstraintLayout>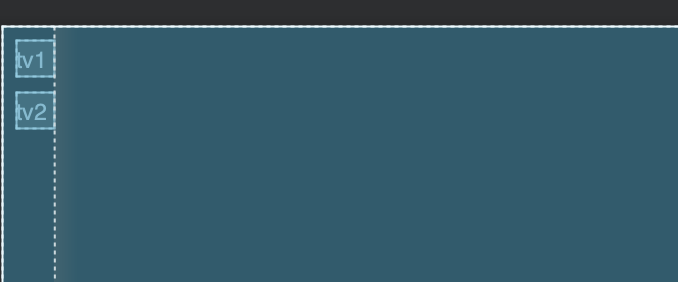
Group
- 여러개의 뷰의 visibility를 한꺼번에 조정
- 그룹의 visibility를 바꾸면 그룹에 속한 모든 뷰의 visibility가 바뀜
- flat해진 구조 덕분에 여러개의 뷰의 visibility를 바꾸어야 할 때 유용함
- 하나의 뷰가 여러 그룹에 속할 경우 , xml에 마지막으로 선언된 그룹의 visibility를 따릅니다.
<androidx.constraintlayout.widget.ConstraintLayout xmlns:android="http://schemas.android.com/apk/res/android"
    xmlns:app="http://schemas.android.com/apk/res-auto"
    android:layout_width="match_parent"
    android:layout_height="match_parent"
    android:orientation="vertical">

    <TextView
        android:id="@+id/tv1"
        android:layout_width="wrap_content"
        android:layout_height="wrap_content"
        android:layout_margin="8dp"
        android:text="tv1"
        app:layout_constraintBottom_toBottomOf="parent"
        app:layout_constraintEnd_toEndOf="parent"
        app:layout_constraintHorizontal_bias="0"
        app:layout_constraintStart_toStartOf="parent"
        app:layout_constraintTop_toTopOf="parent"
        app:layout_constraintVertical_bias="0" />

    <TextView
        android:id="@+id/tv2"
        android:layout_width="wrap_content"
        android:layout_height="wrap_content"
        android:layout_margin="8dp"
        android:text="tv2"
        app:layout_constraintBottom_toBottomOf="parent"
        app:layout_constraintEnd_toEndOf="parent"
        app:layout_constraintHorizontal_bias="0"
        app:layout_constraintStart_toStartOf="parent"
        app:layout_constraintTop_toBottomOf="@id/tv1"
        app:layout_constraintVertical_bias="0" />


    <androidx.constraintlayout.widget.Group
        android:id="@+id/group1"
        android:layout_width="0dp"
        android:layout_height="0dp"
        android:visibility="gone"
        app:constraint_referenced_ids="tv1,tv2" />
</androidx.constraintlayout.widget.ConstraintLayout>
ConstraintSet
- 프로그램적으로 constraint를 만드는 기능
- 일일이 바닥부터 만들어내거나
- 다른 xml로 부터 constraint만 뽑아오거나
- ConstraintLayout 인스턴스에서 뽑아오거나 할 수 있습니다.
- 일일이 바닥부터 만들어내거나
- 만들어진 constraint를 Constraint 에 적용할 수 있습니다.
- 동적으로 ConstraintLayout의 모든 뷰 혹은 일부 뷰의 레이아웃을 갱신할 수 있습니다
- ConstraintSet은 constraint 만 갱신하므로 constraint와 관련없는 속성
- (padding, text size...)은 영향받지않음
- TransitionManager , beginDelayedTransition() 을 이용하여 손쉽게 애니메이션 생성가능
ex) ConstraintSetActivity
class ConstraintSetActivity : AppCompatActivity() {

    override fun onCreate(savedInstanceState: Bundle?) {
        super.onCreate(savedInstanceState)
        setContentView(R.layout.activity_constraint_set)


        val constraintSet1 = ConstraintSet()
        constraintSet1.clone(constraintLayout)

        val constraintSet2 = ConstraintSet()
        constraintSet2.clone(this, R.layout.activity_constraint_set2)

        var changed = false
        button.setOnClickListener {

            val transition = AutoTransition()
            transition.duration = 1000

            TransitionManager.beginDelayedTransition(constraintLayout, transition)

            val constraint = if (changed) constraintSet1 else constraintSet2
            constraint.applyTo(constraintLayout)
            changed = !changed

            textView.text = changed.toString()
        }
    }
}
activity_constraint_set.xml
<androidx.constraintlayout.widget.ConstraintLayout
    android:id="@+id/constraintLayout"
    xmlns:android="http://schemas.android.com/apk/res/android"
    xmlns:app="http://schemas.android.com/apk/res-auto"
    xmlns:tools="http://schemas.android.com/tools"
    android:layout_width="match_parent"
    android:layout_height="match_parent"
    tools:context=".MainActivity">

    <ImageView
        android:id="@+id/image"
        android:layout_width="0dp"
        android:layout_height="200dp"
        android:background="@color/colorAccent"
        app:layout_constraintLeft_toLeftOf="parent"
        app:layout_constraintRight_toRightOf="parent"/>

    <TextView
        android:id="@+id/textView"
        android:text="Hello World"
        android:layout_width="wrap_content"
        android:layout_height="wrap_content"
        app:layout_constraintLeft_toLeftOf="parent"
        app:layout_constraintRight_toRightOf="parent"/>

    <Button
        android:id="@+id/button"
        android:layout_width="0dp"
        android:layout_height="wrap_content"
        android:text="animate"
        app:layout_constraintLeft_toLeftOf="parent"
        app:layout_constraintRight_toRightOf="parent"
        app:layout_constraintBottom_toBottomOf="parent"/>

</androidx.constraintlayout.widget.ConstraintLayout>
activity_constraint_set2.xml
<androidx.constraintlayout.widget.ConstraintLayout
    xmlns:android="http://schemas.android.com/apk/res/android"
    xmlns:app="http://schemas.android.com/apk/res-auto"
    xmlns:tools="http://schemas.android.com/tools"
    android:layout_width="match_parent"
    android:layout_height="match_parent"
    tools:context=".MainActivity">

    <ImageView
        android:id="@+id/image"
        android:layout_width="0dp"
        android:layout_height="200dp"
        android:background="@color/colorAccent"
        app:layout_constraintLeft_toLeftOf="parent"
        app:layout_constraintRight_toRightOf="parent"
        app:layout_constraintTop_toTopOf="parent"
        app:layout_constraintBottom_toBottomOf="parent"/>

    <TextView
        android:id="@+id/textView"
        android:text="Hello World"
        android:layout_width="wrap_content"
        android:layout_height="wrap_content"
        android:layout_marginBottom="100dp"
        app:layout_constraintLeft_toLeftOf="parent"
        app:layout_constraintRight_toRightOf="parent"
        app:layout_constraintBottom_toBottomOf="parent"/>

</androidx.constraintlayout.widget.ConstraintLayout>
- ConstraintSet A 를 Constraint B로 갱신한 경우
- A엔 있으나 B에는 없는 뷰 : 이전 constraint 유지
- A엔 없으니 B에는 있는 뷰 : 무시됨
- A에서는 V1,V2가 체인이었으나 B에선 V1만 언급하며, 체인 관계가 깨진 경우
- : 체인관계는 깨지며, V2의 위치는 다시 설정됨
- : 체인관계는 깨지며, V2의 위치는 다시 설정됨
Placeholder
- 기존 뷰의 위치를 재조정하는 가상의 뷰
- Placeholder가 대체한 원래의 뷰는 사라짐
ex)PlaceHolderActivity
class PlaceHolderActivity : AppCompatActivity() {

    override fun onCreate(savedInstanceState: Bundle?) {
        super.onCreate(savedInstanceState)
        setContentView(R.layout.activity_place_holder)

        changeBtn.setOnClickListener {
            ph_1.setContentId(R.id.btn)
        }
    }
}
activity_place_holder.xml
<androidx.constraintlayout.widget.ConstraintLayout xmlns:android="http://schemas.android.com/apk/res/android"
    xmlns:app="http://schemas.android.com/apk/res-auto"
    xmlns:tools="http://schemas.android.com/tools"
    android:layout_width="match_parent"
    android:layout_height="match_parent"
    tools:context=".PlaceHolderActivity">

    <Button
        android:id="@+id/btn"
        android:layout_width="wrap_content"
        android:layout_height="wrap_content"
        android:text="btn"
        app:layout_constraintStart_toStartOf="parent"
        app:layout_constraintTop_toTopOf="parent" />

    <Button
        android:id="@+id/changeBtn"
        android:layout_width="wrap_content"
        android:layout_height="wrap_content"
        android:text="Change"
        app:layout_constraintEnd_toEndOf="parent"
        app:layout_constraintTop_toTopOf="parent" />


    <androidx.constraintlayout.widget.Placeholder
        android:id="@+id/ph_1"
        android:layout_width="wrap_content"
        android:layout_height="wrap_content"
        app:layout_constraintBottom_toBottomOf="parent"
        app:layout_constraintEnd_toEndOf="parent"/>

</androidx.constraintlayout.widget.ConstraintLayout>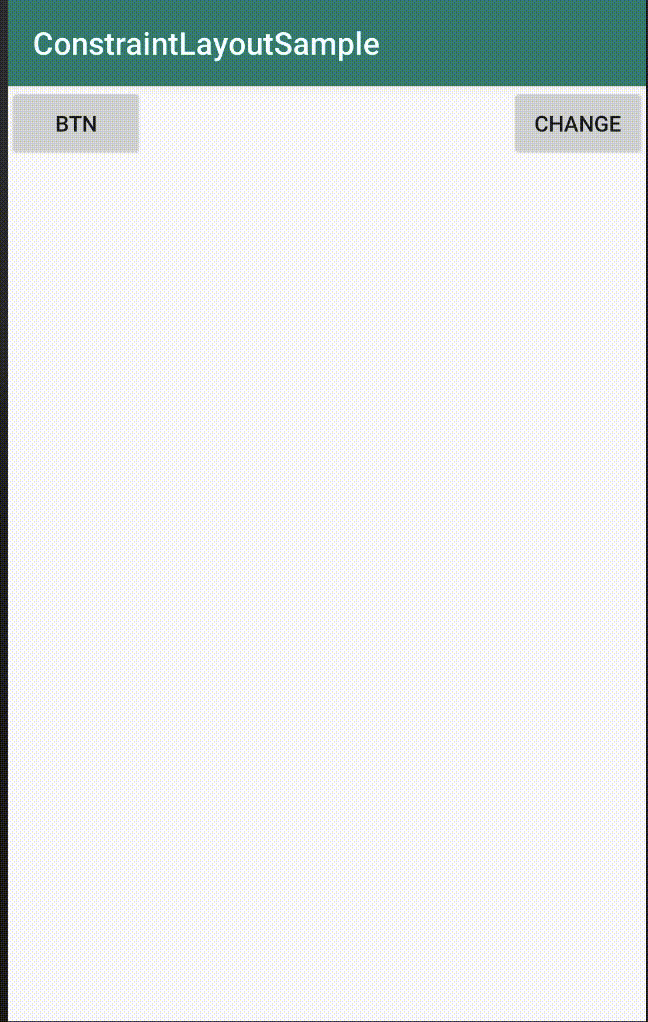
PlaceHolder의 용도
- 동일한 속성을 가진 뷰를 배치만 다른 레이아웃에서 재사용 하고자 할 때
- 가로 /세로 레이아웃에서 view를 중복하여 선언하지 않아도 됩니다.
- 하지만 View 크기 컨트롤등에는 문제가 있습니다.
- 가로 /세로 레이아웃에서 view를 중복하여 선언하지 않아도 됩니다.
- Runtime 에 하나 혹은 여러 뷰의 위치를 바꿀 수 있습니다.
- ConstraintSet과는 조금 다르게 xml상에서 선언할 수 있느 장점이 있고,
- 하나의 placeHolder에 여러 뷰를 번갈아가며 위치시킬 수 있습니다.
Issue 다루기 (심화학습)
wrap_content
- 텍스트가 긴 TextView에서 wrap_content가 의도치않게 동작할 수 있음
- 마진이 무시됨
- 측정해보면 constraint 크기가 아닌 parent 크기까지 폭이 늘어남

- 따라서 wrap_content를 constraint영역 내에 제대로 표현하려면 추가 설정 필요
- 크기는 android:layout_width="wrap_content"
- app:layout_constraintWidth="true"설정을 추가
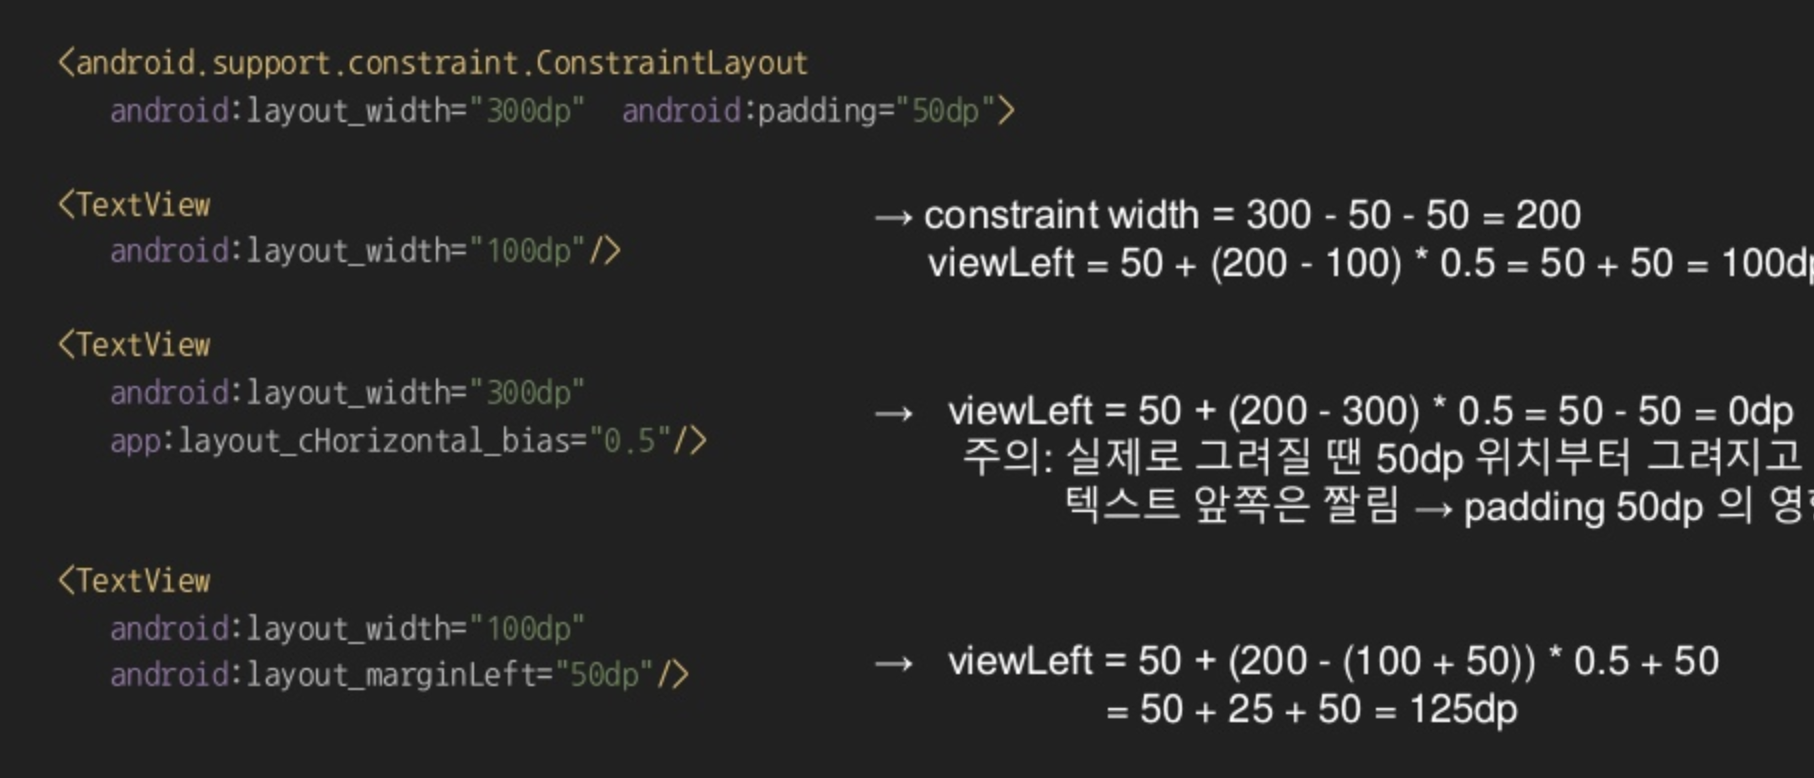
패딩, 마진과 레이아웃 관계
- 부모뷰의 패딩은 constraint 영역에서 빼야함
- ex)300dp 폭, 좌우 패딩 50dp 이라면 constraint 영역은 300-(50)*2 = 200dp
- guildline은 부모 뷰의 패딩을 적용한 위치에 만들어짐

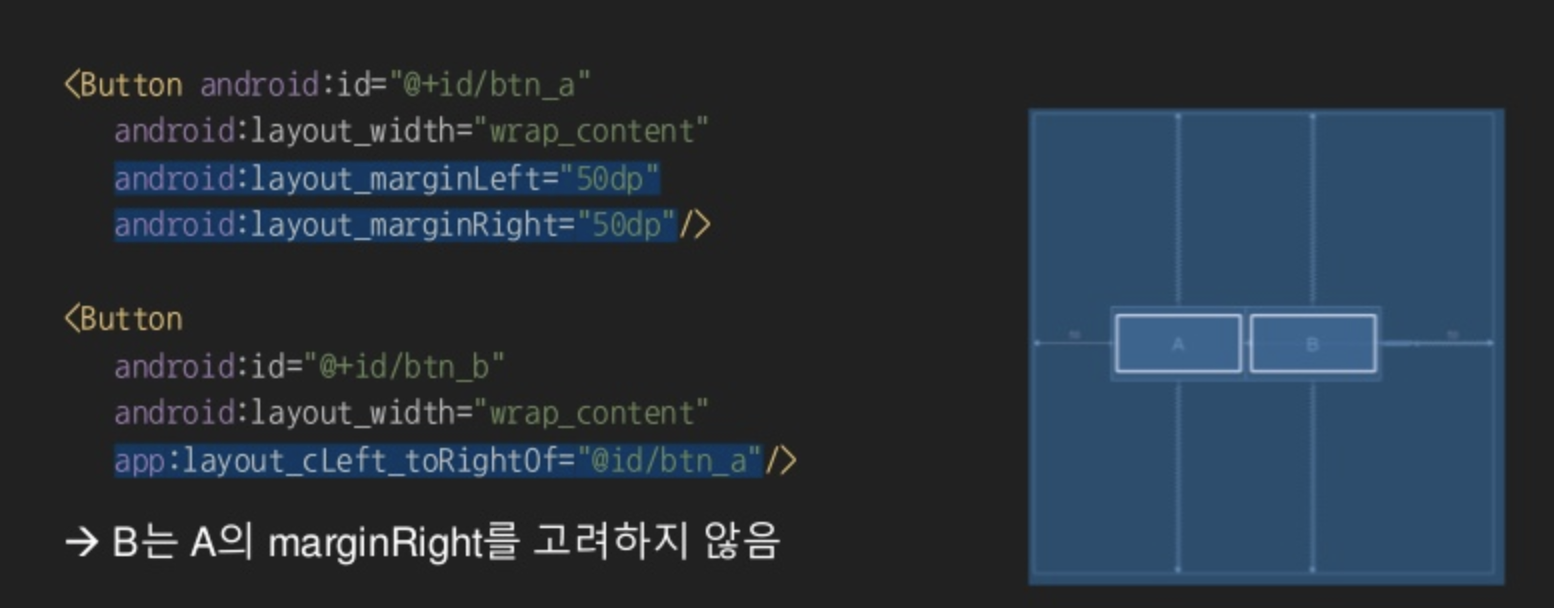
- 체인이 아니어도 다른 뷰와 constraint 관계를 맺을 수 있으나, 상대 뷰의 margin 은 고려되지 않음
- margin 까지 고려하면 chain 관계를 가져야 함
바라보는 뷰가 gone인 경우 - 체인
- gone된 뷰는 없었던 뷰 취급
- 뷰 크기는 0dp, 뷰의 마진도 0dp처리
- 체인 헤드는 사라져도 여전히 헤드 역할을 함
- A-B-C 체인에서 A가 gone인 경우, B가 새로운 헤더가 되지않고 여전히 A가 체인의 헤더역할을함
샘플코드보러가기
https://github.com/qjatjr1108/ConstraintLayout_Sample
'Android > Android관련 이것 저것..' 카테고리의 다른 글
| View가 그려지는 과정 알아보기 (4) | 2019.10.02 |
|---|---|
| OOM Killer ,LMK (2) | 2019.09.10 |
| AppBundle 알아보기 (2) | 2019.09.05 |
| 안드로이드 스튜디오 단축키 (2) | 2019.03.10 |
| 안드로이드 디버그 - 중단점 걸기 (4) | 2019.02.13 |


댓글